Audio latency explained: why your recordings feel late
Fix distracting audio delay with a clear guide to buffer size, direct monitoring, plugin latency and the difference between slow monitoring and late recordings.
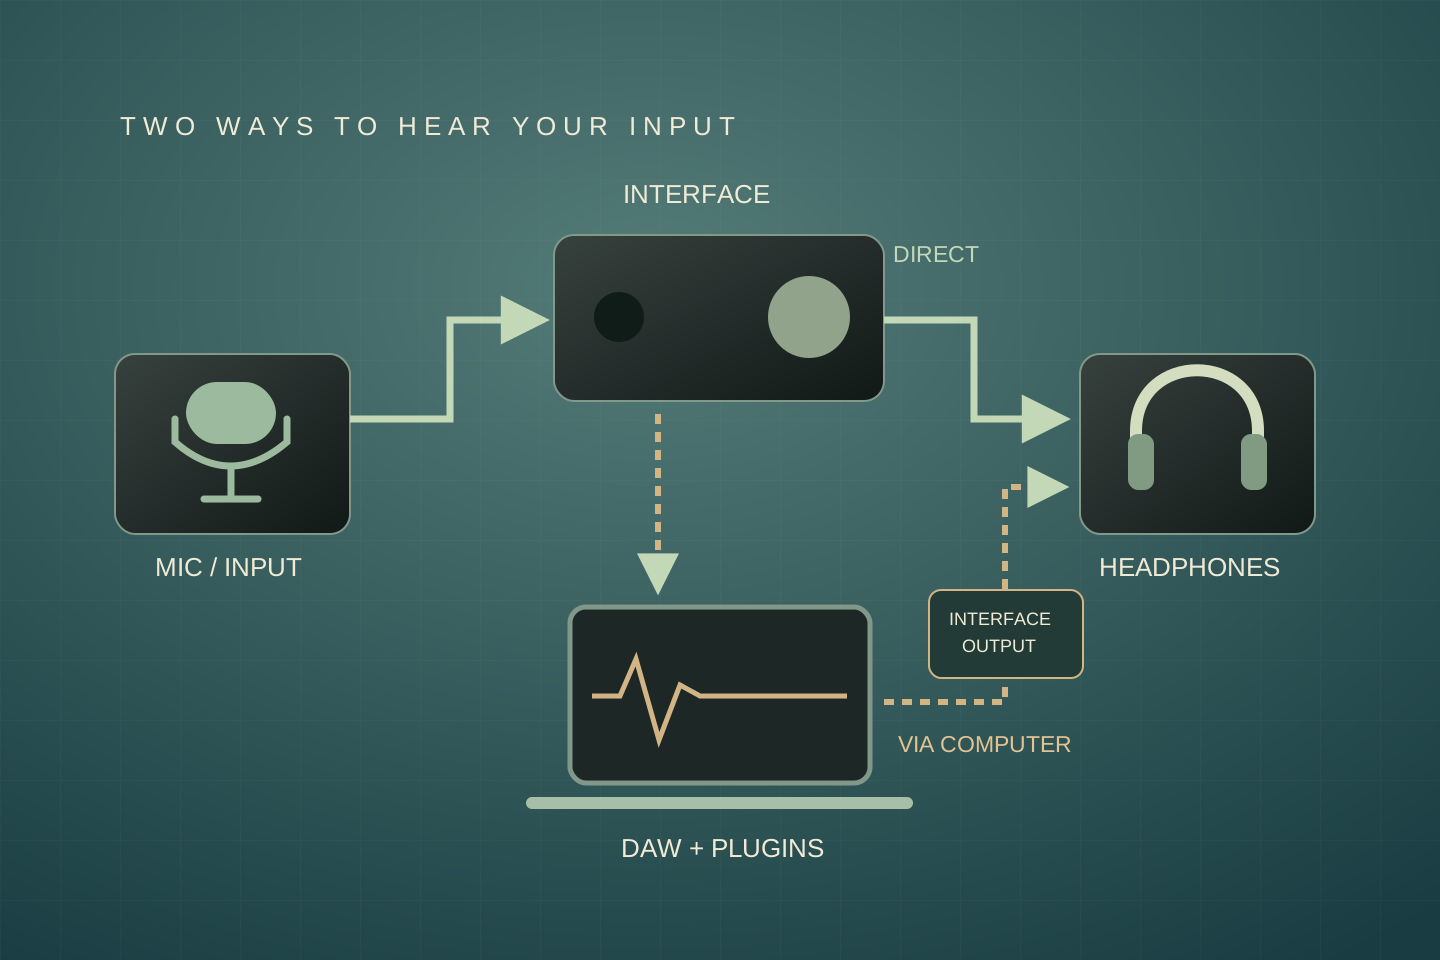
Press a key and the note arrives a little later. Sing into a microphone and your headphones answer after you. That delay is latency: the time between an action and the sound you hear. A tiny amount is unavoidable in a digital system, but a distracting amount can make a good performance much harder.
The right fix depends on the path the sound takes. A microphone can often be monitored inside an interface. A software synth must be generated by the computer. A finished mix can tolerate settings that would feel sluggish while playing. Start by identifying which of those jobs you are doing.
Match the symptom to the first check
Scroll the table to see every column →
| Symptom | Check first | Try next |
|---|---|---|
| Voice or guitar arrives late | Software monitoring and buffer size | Use direct monitoring if you do not need DAW effects |
| A software instrument feels slow | Output device and buffer | Use wired listening and a simpler instrument chain |
| A project became slow after mixing | Master, group and return processing | Try the DAW’s low-latency monitoring mode |
| Crackles at a small buffer | Whether the computer can meet the deadline | Increase one step and simplify the project |
| Voice sounds doubled or hollow | Direct and software monitoring together | Use one dry monitoring path |
| Recorded clip lands late but monitoring feels fine | Recording compensation and routing | Run the DAW’s documented calibration procedure |
Change one thing at a time and repeat the same short performance. Note the device, buffer, sample rate and plugins. That gives you evidence of what helped instead of an afternoon of settings you cannot retrace.
Where the delay comes from
Your DAW processes audio in blocks. Those blocks give the computer time to calculate the next piece of sound. Drivers and converters contribute additional delay, while some plugins deliberately wait before producing an output. Bluetooth introduces another listening delay that a DAW buffer adjustment cannot remove.
A MIDI keyboard follows a different route: the controller sends a note message, the software instrument creates audio, and the output system plays it. There is no microphone input conversion in that path. This is why the interface’s direct-monitor switch cannot make a virtual piano respond instantly.
It also helps to separate monitoring delay from a misplaced recording. You can hear yourself late while the DAW places recorded audio correctly using driver information. Conversely, an incorrect recording offset can shift a clip even when direct monitoring feels comfortable. Fix the symptom you have rather than moving every clip by eye.
Buffer size: smaller means a shorter deadline
A smaller buffer reduces the time represented by each processing block, but gives the system less time to finish its work. If it misses the deadline, you may hear gaps or crackles. A larger buffer can make a busy mixing session more reliable while adding delay to live playing.
Scroll the table to see every column →
| Buffer | One buffer at 48 kHz | A practical use to try |
|---|---|---|
| 64 samples | 1.33 ms | Playing or recording in a light project |
| 128 samples | 2.67 ms | A useful starting point for tracking |
| 256 samples | 5.33 ms | More processing headroom if 128 crackles |
| 512 samples | 10.67 ms | Mixing when immediate response is unnecessary |
| 1,024 samples | 21.33 ms | Heavy playback sessions rather than live performance |
The calculation is buffer samples ÷ sample rate × 1,000. At 48,000 samples per second, 128 samples last 2.67 milliseconds. Two such buffers would represent about 5.33 milliseconds, but actual round-trip latency also includes the rest of the system. The figures above are arithmetic examples, not interface benchmarks.
Try 128 samples at your project’s existing 44.1 or 48 kHz rate, then test the busiest passage. If it feels slow and runs cleanly, try 64. If it crackles, try 256. Doubling the sample rate halves the duration of the same sample-count buffer, but increases processing demands; it may not improve the final working result. Choose a project rate deliberately rather than changing it mid-session as a first fix.
Direct monitoring: a shorter route for real inputs
Direct monitoring sends the interface’s input to its listening outputs without a trip through the DAW. It is useful when recording a voice or instrument that already sounds like what you need to hear. Some interfaces use a switch; others provide an input/playback blend knob or a mixer application.
If you need to hear a software guitar amp, listen through the DAW and optimise that route. If you only need the dry guitar while recording, direct monitoring may be enough. Interfaces with onboard DSP can provide their own effects, but those are a separate processing system with model-specific capabilities.
When the vocal sounds hollow or like a very short echo, check for two copies: the interface’s direct signal and the slightly later DAW signal. Turn down one dry path. Direct monitoring is commonly described as zero-latency, but the useful promise is that it avoids the computer round trip; do not treat that phrase as a measurement of every internal digital mixer.
A small buffer cannot remove plugin lookahead
Some processors need extra time for their algorithm. Lookahead dynamics, some linear-phase processing and certain oversampling modes can add delay. Check the plugin’s documentation and its reported latency rather than assuming every device of a particular type behaves alike. The offending processor can be on a group or master bus, not just the track you are recording.
Delay compensation keeps paths aligned by delaying faster ones to match slower processing where required by the DAW’s routing. That is helpful for a finished mix, but it cannot make a live performance happen earlier. Disabling compensation globally can change alignment, so it is not a sensible first fix for a recording session.
Logic Pro offers Low Latency Mode; Ableton Live offers Reduced Latency When Monitoring. These affect monitoring and processing differently, so follow your DAW’s instructions and listen for changes to the sound. A low-latency mode is not a faster computer. If bypassing a plugin does not change the reported delay, test removing it from a saved copy of the project: some bypass modes retain latency.
A ten-minute test before buying another interface
- Save a copy of the session. Switch to wired headphones or wired monitors and select the intended audio device.
- On Windows, use the interface manufacturer’s supported ASIO driver where available. On macOS, select the intended Core Audio device. Confirm current operating-system compatibility.
- Create a blank project at the same sample rate. Use one audio track or a simple software instrument, with no master processing.
- Try 128 samples and repeat a short phrase. Compare 64 and 256 while noting response and crackles; do not assume the lowest available setting is the best stable setting.
- For an external input, compare direct monitoring with software monitoring, listening to only one dry path at a time.
- Return to the original session. Temporarily remove suspect processing from the saved copy, including group, return and master effects, then repeat the phrase.
- If only the complex session struggles, simplify it for tracking. Preserve editable originals when printing parts. Restore the full mix chain for review afterwards.
This separates a project-specific problem from a device or driver problem. A new interface may help when the existing driver cannot operate reliably at the buffer you need. It will not make a deliberately delayed plugin instantaneous. If the blank project also fails, investigate the device, cable, driver and computer before assuming the song is too complex.
When the recorded clip is in the wrong place
Recording compensation accounts for delay when placing captured audio on the timeline. If a repeatable offset remains, use the manufacturer’s or DAW’s documented measurement procedure. A driver-error or recording-offset control changes placement; it is not a cure for slow headphone monitoring.
A loopback calibration normally uses an appropriate line output and line input at controlled levels. Follow the procedure for your exact hardware and DAW, and avoid routing the returning signal back to the same output. Do not calibrate from a vocalist’s performance or assume that every transient should sit exactly on a grid. Performance timing and system delay are different things.
If the recording drifts progressively over a long take, that is a different clue from a fixed delay. Check device configuration, clocks and sample-rate settings using the relevant documentation. Moving the start of a clip does not explain a growing timing difference.
Common questions
What is a good latency number?
The useful target is a response that feels comfortable and stays reliable for your performance. Compare the DAW’s reported input/output values under the same settings, then test the actual playing experience. A buffer size alone is not a round-trip measurement.
Why does the exported track sound fine?
A normal offline export does not have to respond to your live playing in real time. Monitoring delay can make recording awkward without becoming an echo in the exported file. Actual doubled monitoring recorded into a track is a different problem.
Will USB-C automatically mean lower latency?
No. USB-C describes the connector. Driver behaviour, buffering, converters and the project’s processing matter. Choose an interface for verified compatibility and the recording job, not the shape of its socket.
Why does 64 samples work in one project but crackle in another?
The projects may ask for very different amounts of real-time processing. Complex instruments, effects and routing can exhaust the available time. Test a clean project and increase the buffer or simplify the recording session as needed.
Set up for the session you are about to record
Keep a light recording version of a large project, write down settings that work on your system, and choose the appropriate monitoring path before a performer starts. Those habits are more useful than chasing the smallest number in a settings window.
Sources & further reading
Original specifications, manuals and price listings used in this guide.