Four new FX for your drum machines
Meet Convolve, Neptune, Relay and Flux: recorded spaces, expansive reverb, rhythmic echoes and micro-pitch width for the TR-808, LinnDrum and TR-909.
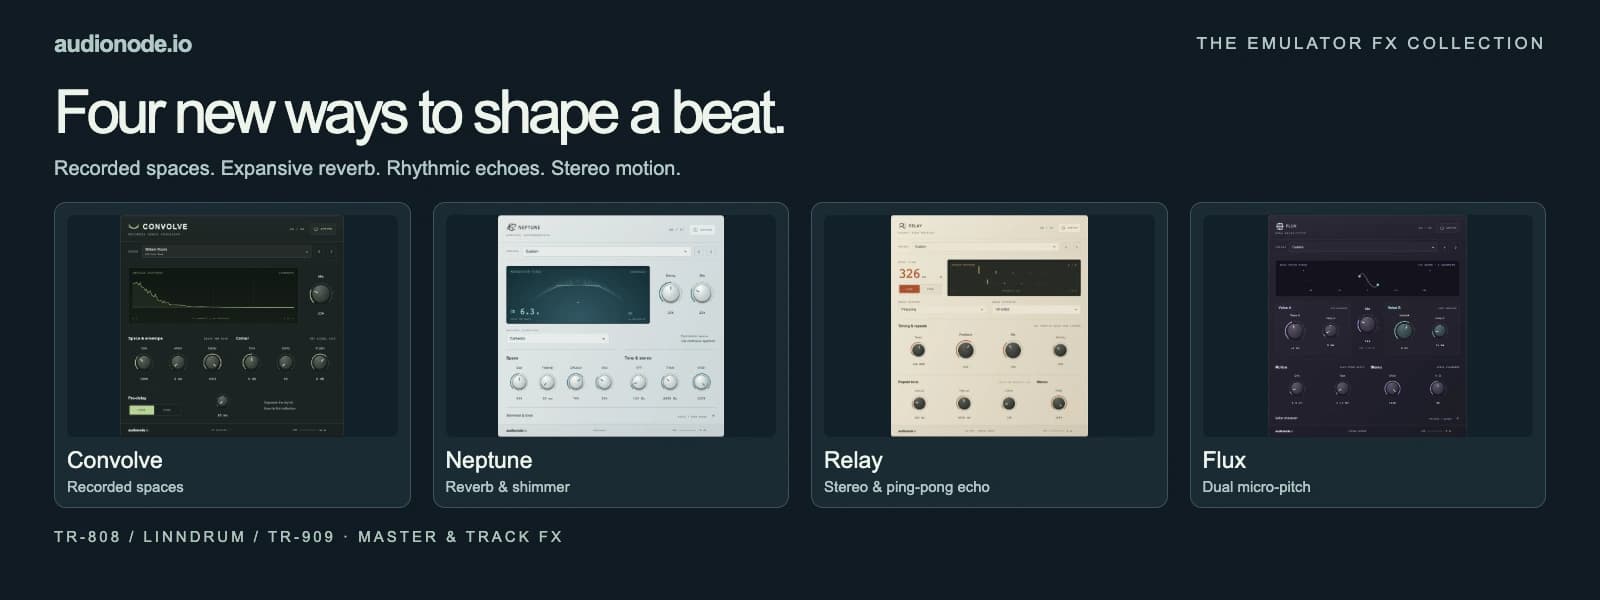
The TR-808, LinnDrum and TR-909 now have four more ways to shape a beat. Convolve puts drums into recorded acoustic spaces. Neptune builds everything from compact rooms to long, shifting reverb. Relay turns hits into timed stereo echoes. Flux adds two detuned voices for width and movement.
All four are available in both the master rack and each drum’s track FX drawer. They join Quake, Bastion, Mirage, Spool and Clasp, bringing the collection to nine effects. Here is what the new units do, how their controls work, and where to start with a drum pattern.
Add an effect to a drum or the whole beat
Open Emulators and choose a machine. Enable audio, then use Add FX in the Master FX rack to process the whole mix. To treat one sound, select the FX button on its sequencer row and use Add FX in that track’s drawer. Track effects feed the master effects, so a snare reverb will still pass through any processing on the master bus.
Scroll the table to see every column →
| Effect | What it adds | A useful first destination |
|---|---|---|
| Convolve | The reflections and decay of a recorded space | A room around a snare, clap or tom |
| Neptune | Eight reverb structures, modulation and optional shimmer | An atmospheric snare or cymbal tail |
| Relay | Stereo or ping-pong repeats with feedback and ducking | Rhythmic clap, rim-shot or percussion echoes |
| Flux | Two gently pitch-shifted voices with stereo spread | Width on hats, claps and percussion |
Start on a single track and bring up Mix gradually. Use the unit’s ACTIVE/BYPASS button to compare, and drag the rack handle to change the order. Bastion stays in its fixed display position and processes last for peak protection. Each panel groups controls by their role in the sound. Neptune’s Shimmer & tone and Flux’s Voice character expand to reveal deeper settings. Drag a knob vertically, hold Shift for fine adjustment, or click its value to type a number; double-click the knob to reset it. Arrow keys also adjust a focused knob. The screenshots below show the actual master-rack panels; select an image to inspect it at full size. The same controls reflow into a narrower layout in track drawers and on phones.
Convolve: put the kit in a recorded space
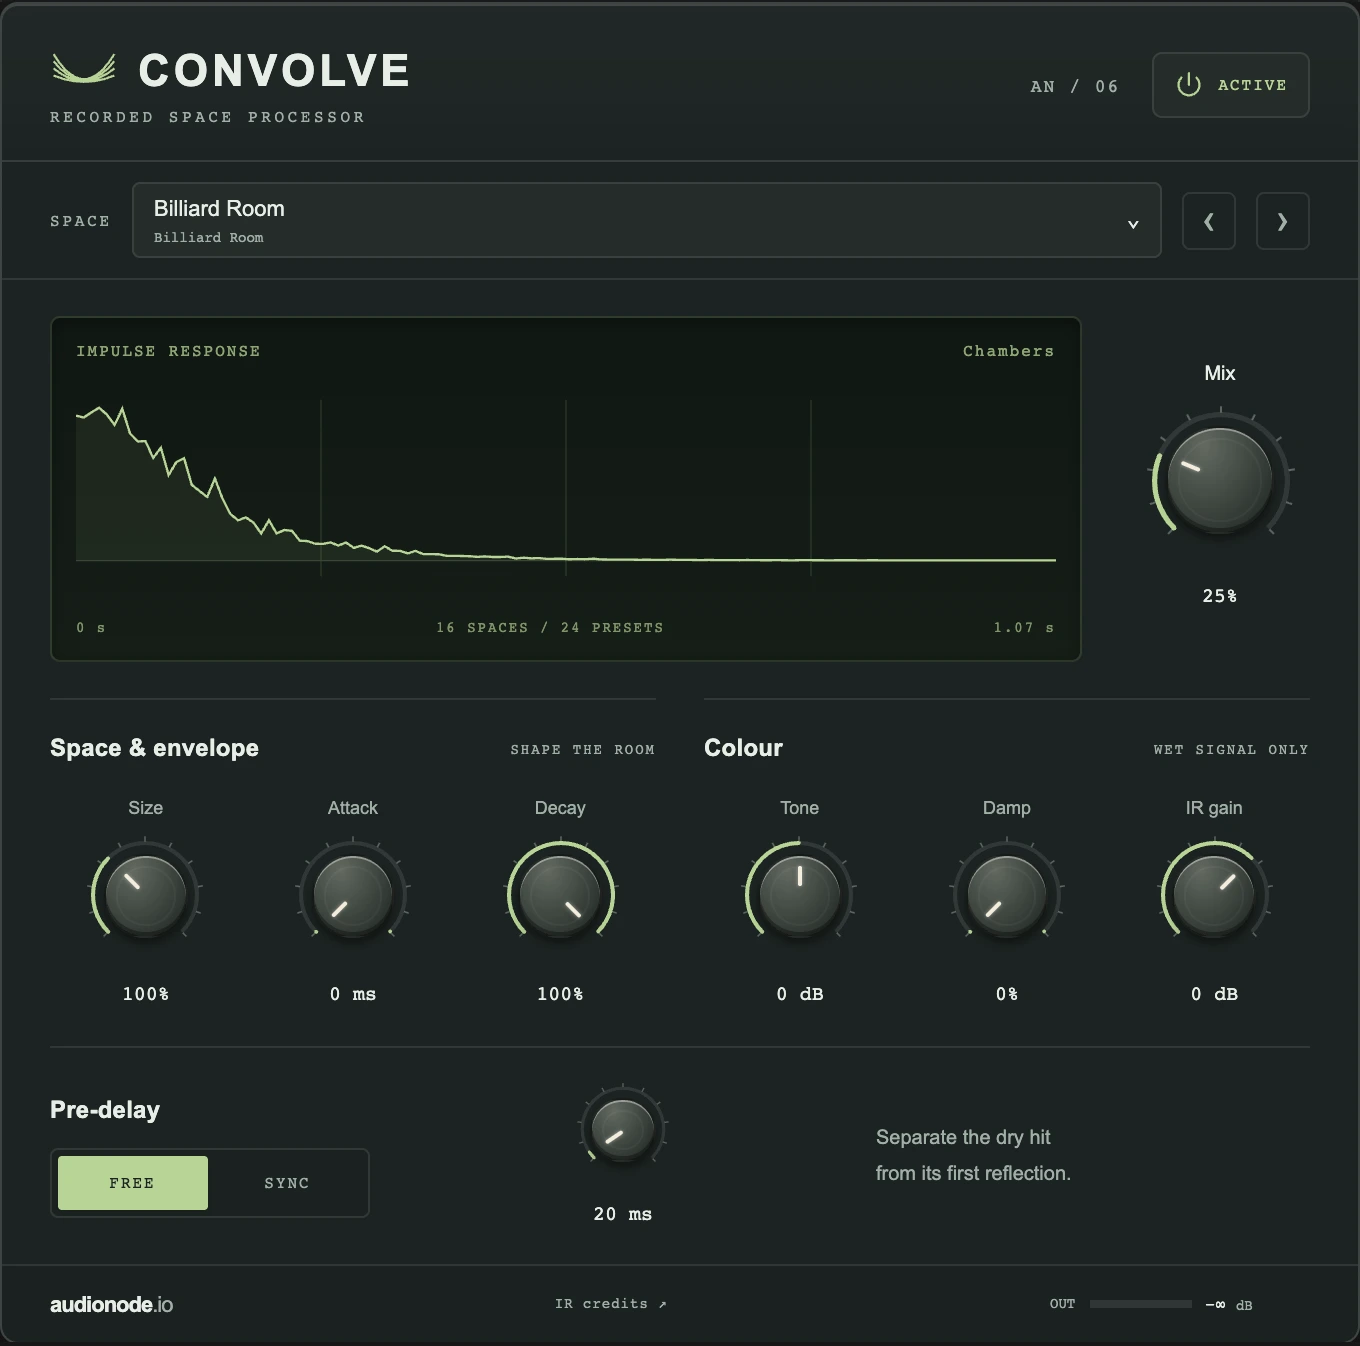
Convolve uses an impulse response: a recording that describes how a space responds to a brief sound. It applies those reflections to each drum hit. The library contains 16 recorded spaces and 24 factory voicings, giving you both a choice of rooms and prepared settings for shaping them. The display shows the response envelope and its duration after Size scaling; it is a view of the response, not the waveform of your drum.
- Size runs from 50–200%. It resamples the response, changing the timing and character of the reflections as well as the tail length. Use 100% for its original scale.
- Pre-delay separates the dry hit from the first reflections by 0–500 ms. Tempo Sync replaces that setting with a musical division and an explicit BPM, capped at four seconds. Set that BPM to match your pattern; it does not automatically follow the sequencer tempo.
- Attack fades in the response over 0–500 ms. It softens the arrival of the ambience. Decay, from 10–100%, applies an envelope that shortens the recorded tail; 100% preserves the tail at the chosen Size.
- Tone tilts the wet frequency balance around 1.5 kHz, with up to ±6 dB of tilt. Damp progressively reduces high frequencies through the response, making later reflections darker. Tone is the broad colour control; Damp changes how that colour develops through the tail.
- IR gain adjusts only the convolved signal from −24 to +12 dB. Mix blends dry and wet linearly; 100% is convolution only. Bypass returns to the dry sound with a short transition.
The recordings come from the Sonic Palimpsest Impulse Response Library, © 2022 Sonic Palimpsest team, University of Kent, under CC BY 4.0. They capture heritage spaces at Chatham Historic Dockyard. The bundled playback copies are trimmed, DC-corrected, faded and normalized; the shaping controls transform them further. The credits include the original sources and preparation details.
Neptune: rooms, long tails and shimmer
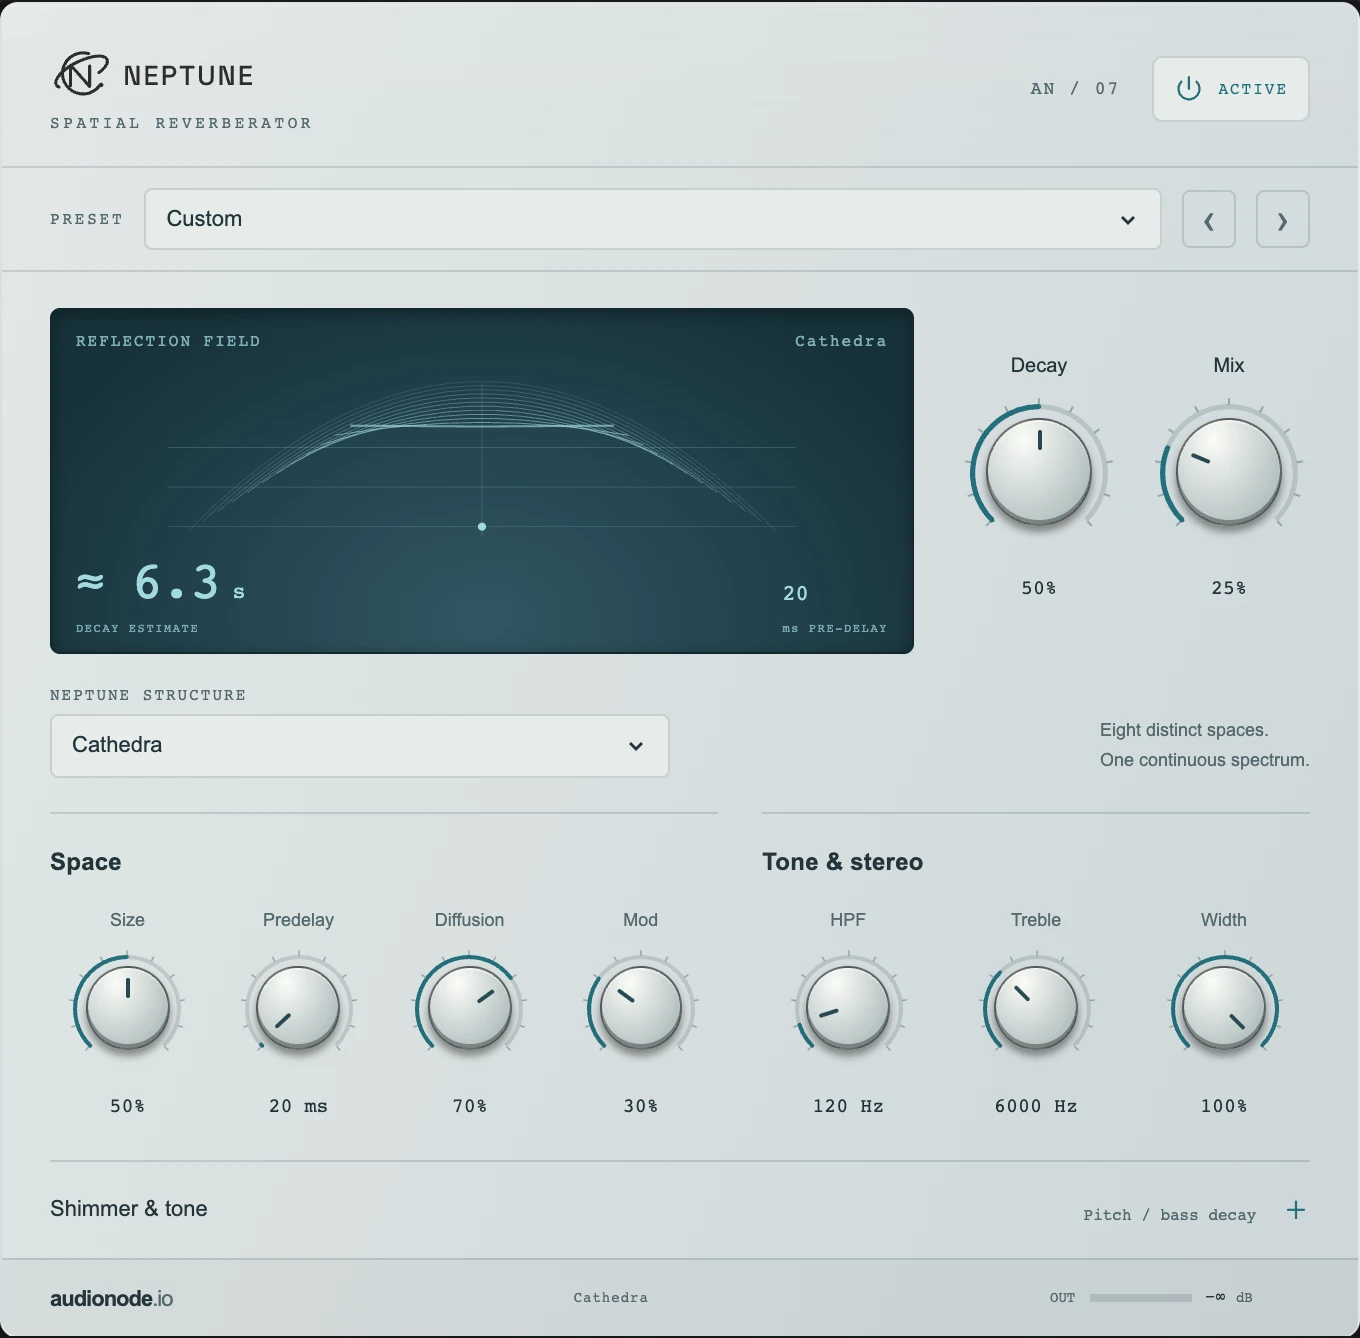
Neptune is an algorithmic reverb with eight structures: Ultraplate, Cathedra, Spring, 78 Room, 78 Plate, 78 Hall, Prism and Gravity. Unlike Convolve, its space is synthesized rather than read from a room recording. Structure changes the reverb design and the range of its decay control, so switching structures at the same Decay percentage can produce very different tail lengths. The nine starting presets combine structure, tone and mix settings.
- Decay controls how long the energy persists. Size changes the scale of the reverb network. Predelay runs from 0 to 2,540 ms and leaves a gap before the reverb develops, helping the initial drum transient remain distinct.
- Mod introduces movement in the reverb, while Diffusion changes how the reflections build into a dense tail. Start with modest Mod for a stable room and increase it for a more animated, sustained texture.
- HPF is the low-cut control, spanning 20–1,000 Hz. It keeps low frequencies out of the reverberant treatment. Neptune retains the dry bass below this cutoff even at 100% Mix, so that setting does not make it a completely wet-only send effect.
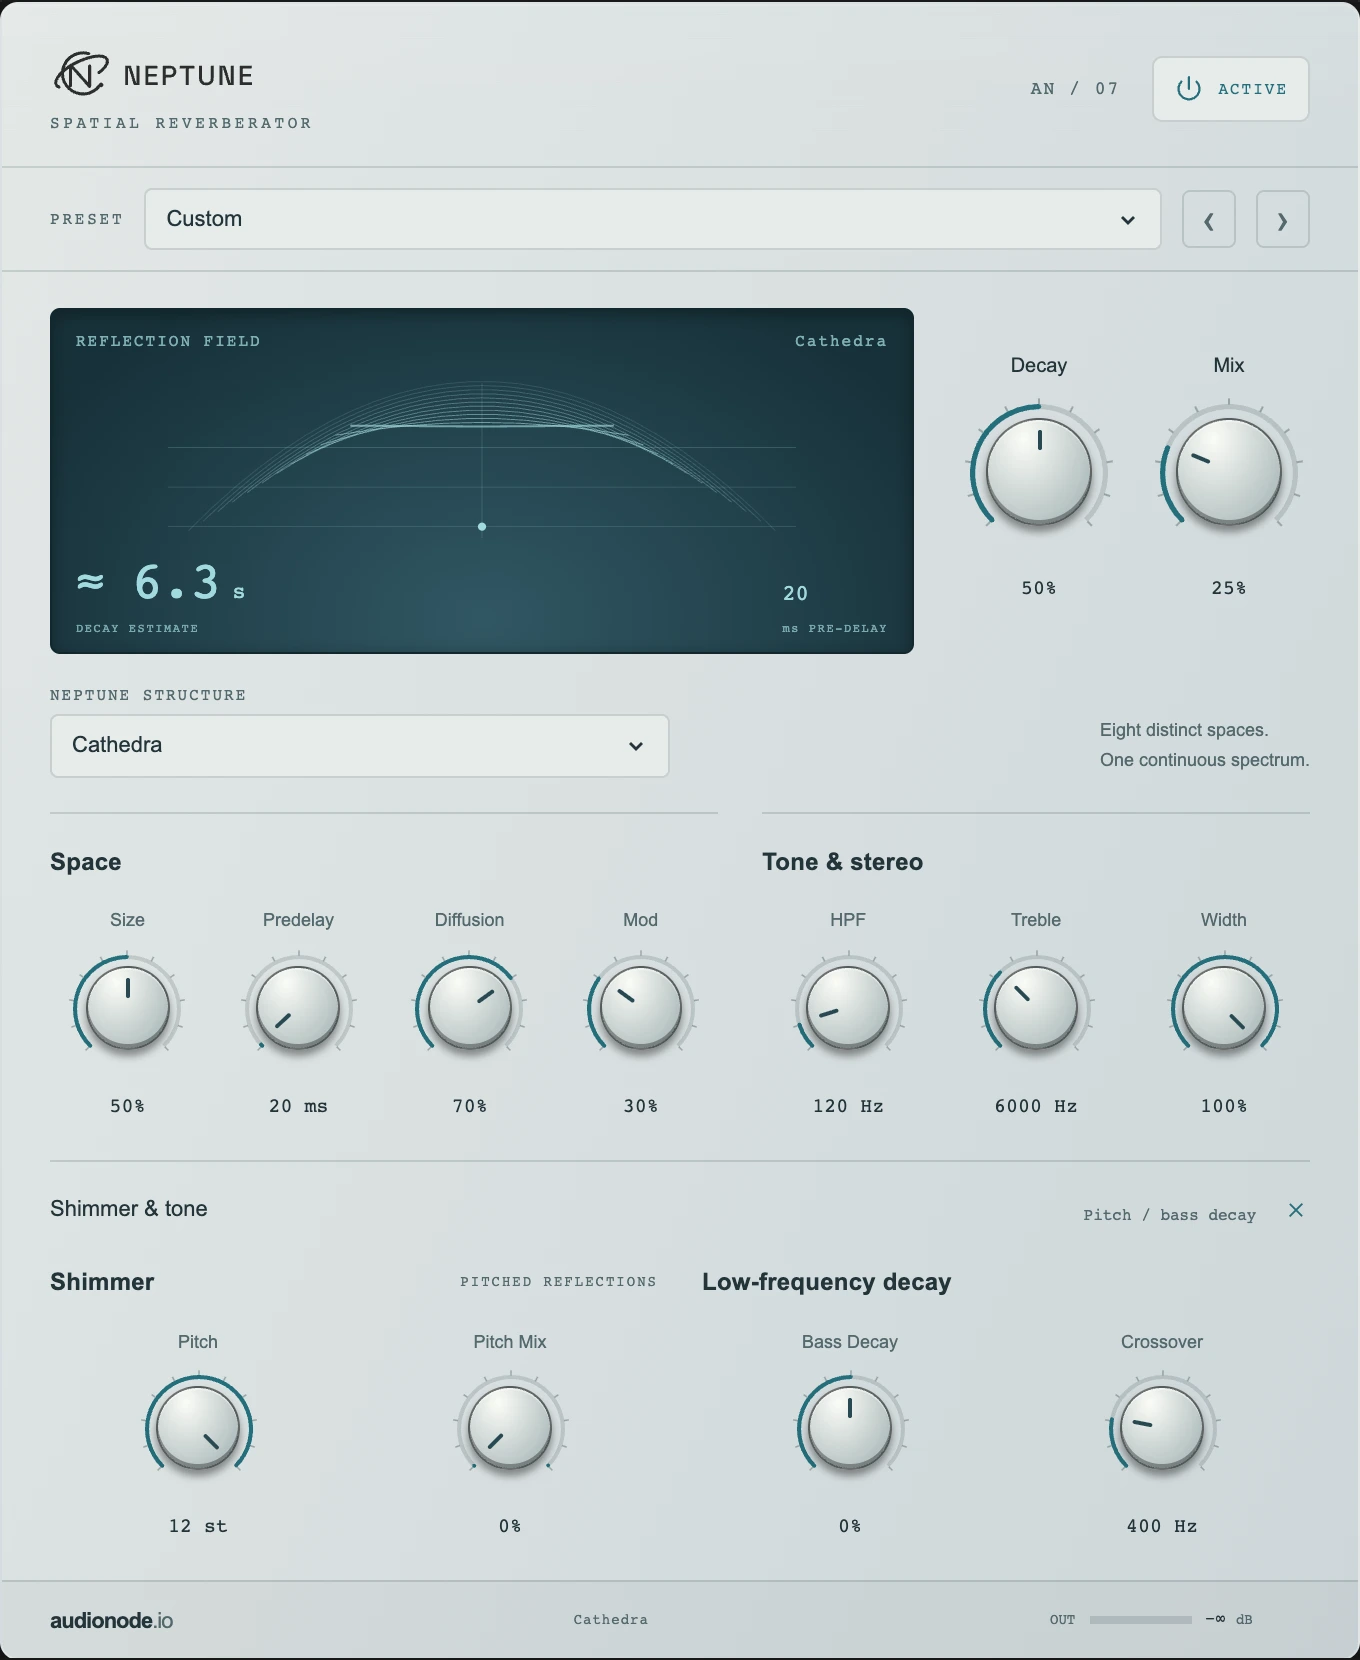
- Expand Shimmer & tone: Pitch shifts the shimmer voice from −12 to +12 semitones, and Pitch Mix blends it into the reverb. These controls operate in Ultraplate, Cathedra and Gravity; they are disabled for the other structures.
- Bass Decay changes the low-frequency decay relative to the rest of the tail, with Crossover choosing the dividing frequency from 60–1,700 Hz. Treble sets the high-frequency damping control from 1–16 kHz. Width changes the stereo spread; Mix sets the overall reverb blend.
Relay: echoes that become part of the rhythm
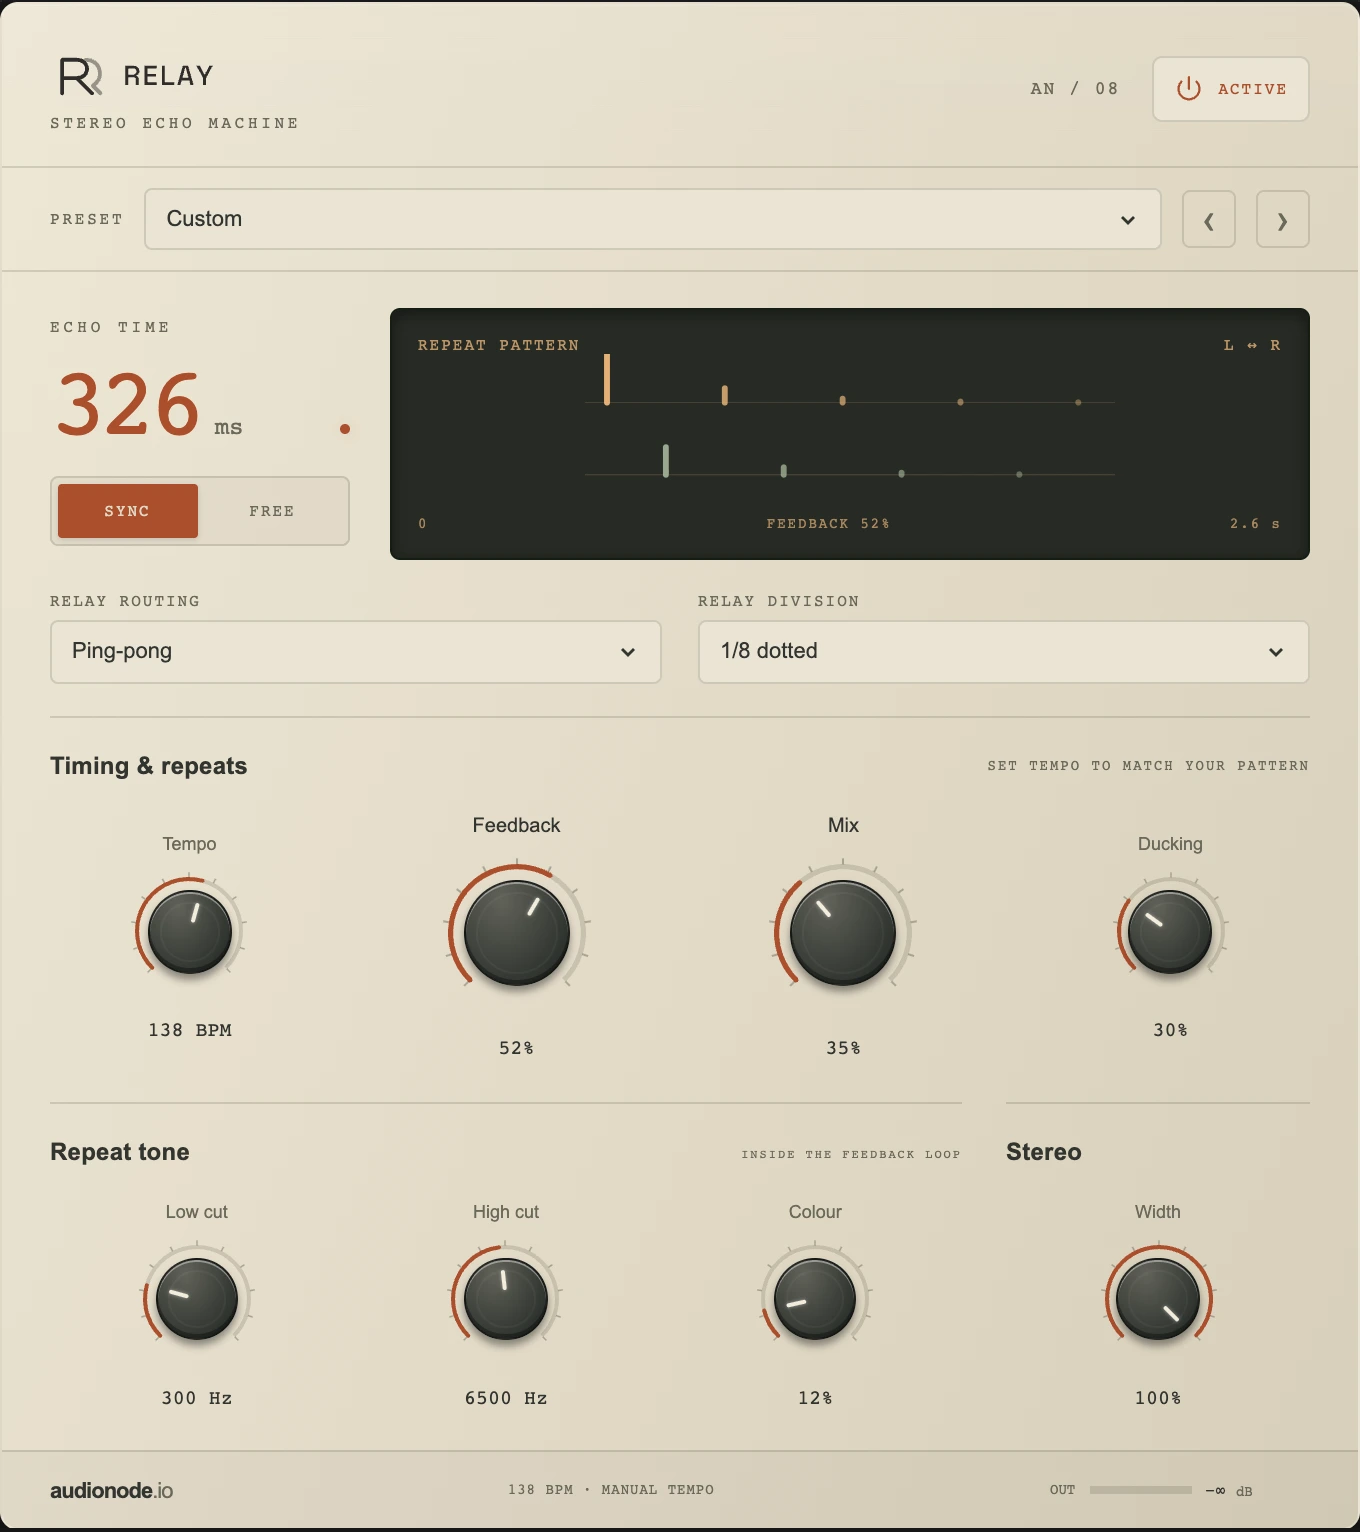
Relay adds distinct repeats instead of a continuous reverberant space. Stereo routing keeps echoes on their respective sides; Ping-pong alternates them across the stereo field. Feedback sends part of each delayed signal around again, so turning it up creates more repeats. Its maximum is 85%. Mix determines how much of that echo you hear alongside the source.
- SYNC offers half, quarter, eighth and sixteenth notes, with dotted and triplet variants for the quarter, eighth and sixteenth divisions. Set Tempo to match the pattern, between 60 and 200 BPM. This is Relay’s own tempo control; changing the drum machine’s tempo does not update it automatically.
- In FREE mode, use Free time in Timing & repeats for a 30–2,000 ms delay. Short settings produce slapback or a close double; longer settings leave a clearly audible gap. Free time takes the place of Tempo in this mode.
- Low cut, 40–1,200 Hz, and High cut, 1.5–12 kHz, filter the feedback path. Successive repeats become more filtered, helping them recede behind the dry hit. Colour adds gentle saturation in that same feedback path.
- Ducking reduces the wet signal while the source is active, then releases over roughly 220 ms. It can keep echoes from crowding a busy drum pattern. Width controls the stereo spread of the return.
Time changes crossfade between read heads, and other controls are smoothed. Bypass fades the processing away while the internal delay continues running. Keep an ear on the level when combining high feedback, Colour and other effects; louder repeats are not automatically a better rhythmic fit.
Flux: width from two detuned voices
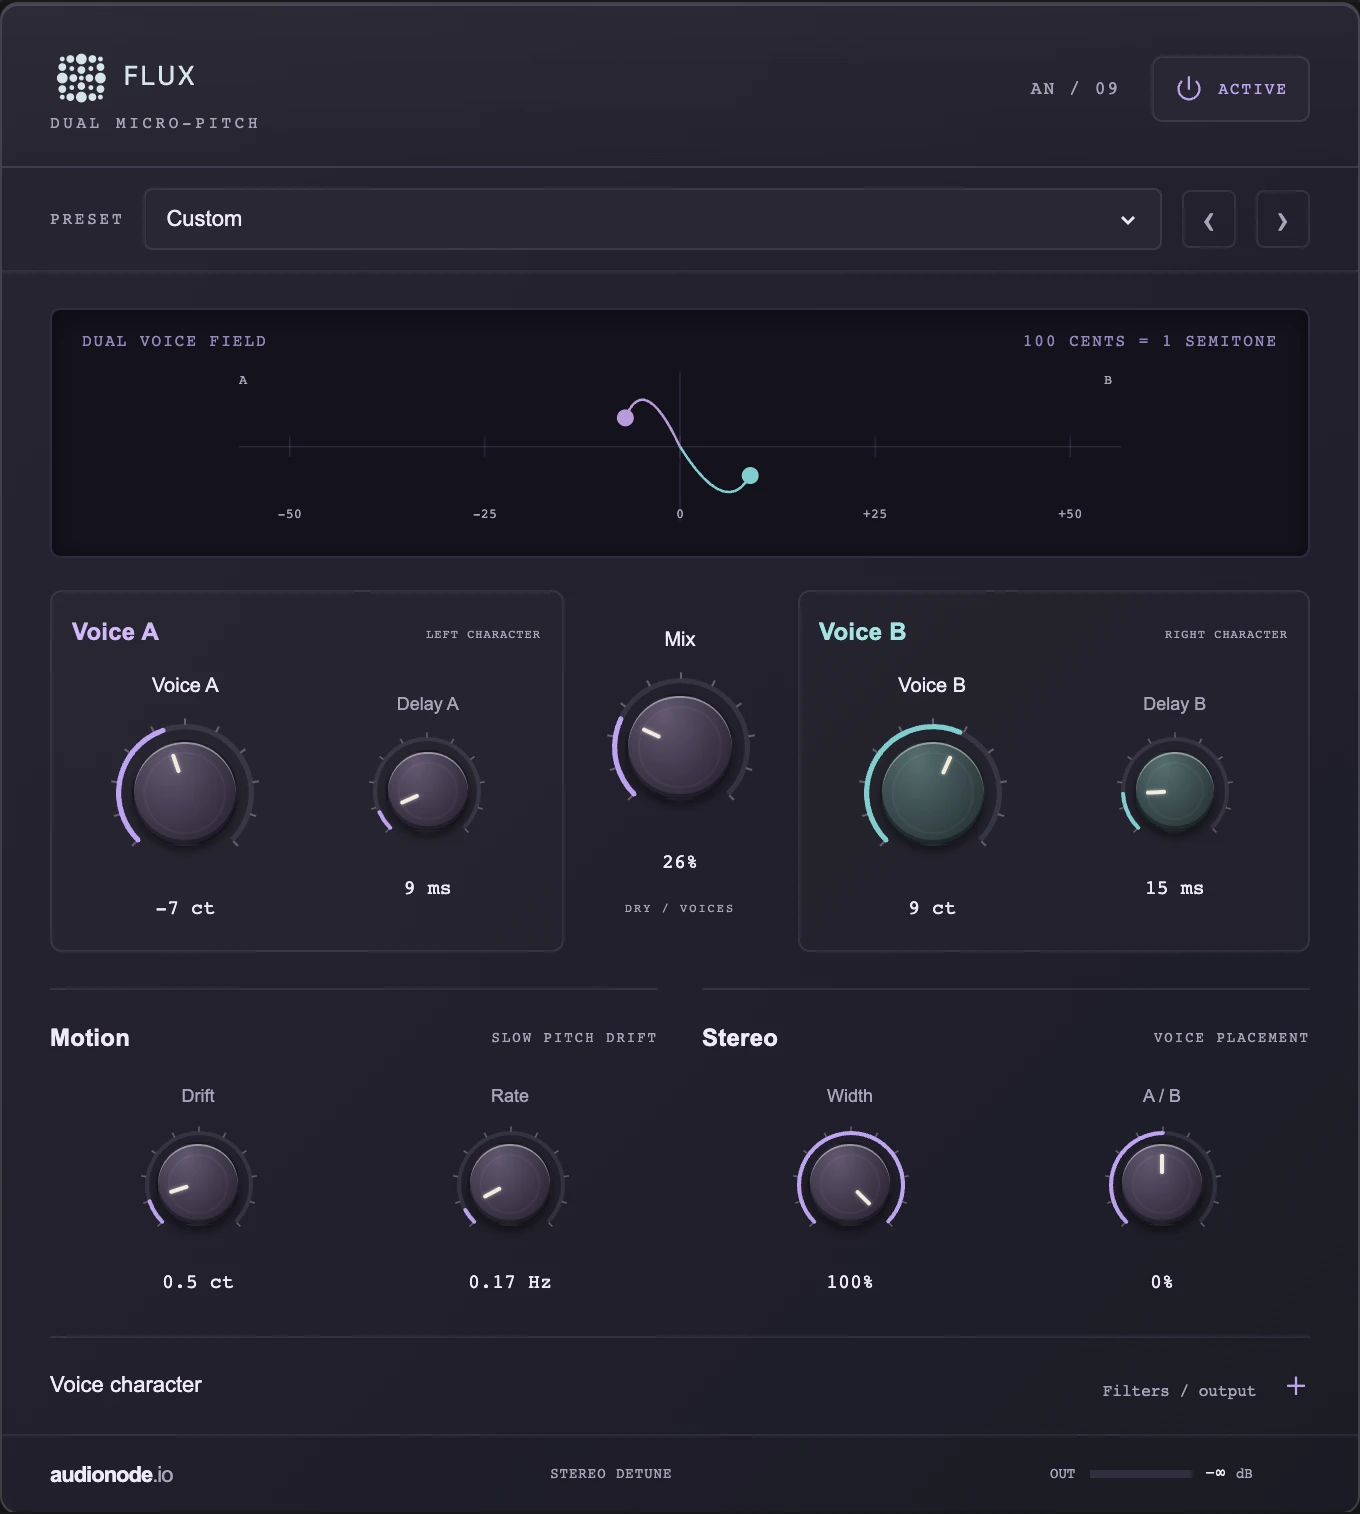
Flux combines your dry sound with two slightly pitch-shifted copies. Each voice can move independently from −50 to +50 cents; 100 cents is one semitone. Small opposing shifts create a doubled texture, and separate delay offsets help the two voices spread around the original. This is a micro-pitch effect for colour and width, rather than a pitch-correction tool.
- Voice A and Voice B set the pitch offsets. Try −6 and +8 cents before exploring larger shifts. Mix blends the shifted voices with the dry signal; around 15–30% is a useful starting range for subtle width.
- Delay A and Delay B add independent offsets of 3–80 ms. The pitch engine also uses a moving 60 ms read window, so these numbers are effect offsets rather than a sample-aligned latency specification. The dry path is not delayed.
- Width controls the stereo side component. In the Stereo group, A / B attenuates one shifted voice relative to the other. Use it to favour one voice without changing its pitch.
- Low cut, 40–1,200 Hz, and High cut, 3–16 kHz, filter only the shifted voices. Raising Low cut can keep the low end centered while the higher-frequency texture spreads out.
- Drift adds up to ±5 cents of slow pitch movement at a Rate of 0.05–2 Hz. Output adjusts the result from −12 to +6 dB. Bypass preserves the original signal and bypasses Output gain as well.
Flux uses overlapping, windowed delay heads to produce its shifted voices. Large pitch offsets, high Mix and substantial Drift can make that grain and motion audible. Treat those settings as a sound-design choice; use smaller values when the original drum’s transient should stay the focus.
Build a chain, save it and export
Order changes what the next unit receives. Flux before Relay gives the echoes the widened tone. Relay before Neptune lets each repeat excite the reverb. Convolve on a snare track adds a shared acoustic character to that voice while the kick stays dry. A little Spool before either reverb colours the signal entering the space. Add one unit at a time and compare at similar output levels.
- For a focused beat: Convolve on the snare or clap, with a modest Mix and shortened Decay; keep the kick’s rack simple.
- For a moving percussion line: Flux into Relay on one track, with subtle detune and a clearly audible rhythmic division.
- For an atmospheric break: Relay into Neptune on a clap or cymbal, then reduce the dry arrangement so the tails have space.
Save pattern retains the track and master FX settings. When downloading audio, leave FX ON enabled to render the rack into the WAV. Exports include estimated effect tails; very long reverb or feedback chains can increase render time and file length, and extreme settings may exceed the bounded single-hit export window. Audition the end of a rendered file when using unusually long chains.
Convolve prepares its responses in the background, so changing a space can take a moment. Multiple long convolution reverbs and simultaneous reverb instances use more CPU and memory. If playback struggles, reduce the number of active spaces or simplify the chain. All nine effects remain available on each of the three drum machines.
Sources & further reading
References and supporting material for this article.